 JUTYE SANITARY
JUTYE SANITARY
JUTYE SANITARY
A Basin Drain is the controlled exit beneath a bathroom or utility basin. It carries used water into the waste pipe while helping prevent odors, leaks, and backflow. The visible opening may look simple, but several parts work together. These include the strainer, drain body, stopper, gasket, and connecting tailpiece. Most systems also rely on a P-trap beneath the basin.
The P-trap holds a small amount of water. That water forms a barrier against sewer gases. Plumbing and heating expert Richard Trethewey explains, “The trap is there to keep sewer gases from coming back into the house.” His statement captures the drain’s most important safety function. Water must move out smoothly. Unwanted gases must stay out.
When the stopper opens, gravity pulls water through the strainer. The water then passes through the drain body and tailpiece. It enters the P-trap before reaching the branch drain. A properly fitted Basin Drain should empty quietly and leave no moisture around the connections. Small leaks often appear first as a damp cabinet floor or a pale ring around a nut.
Installation details matter. A crushed gasket can leak. Excess sealant can restrict flow. Poor alignment may stress the pipe. These mistakes are easy to overlook. Even a clean-looking drain can perform badly when the trap is blocked. Hair, soap residue, and mineral deposits gradually reduce the opening. Regular cleaning helps, although it cannot correct damaged threads or a badly fitted seal. The design is straightforward, but real plumbing often demands careful inspection.
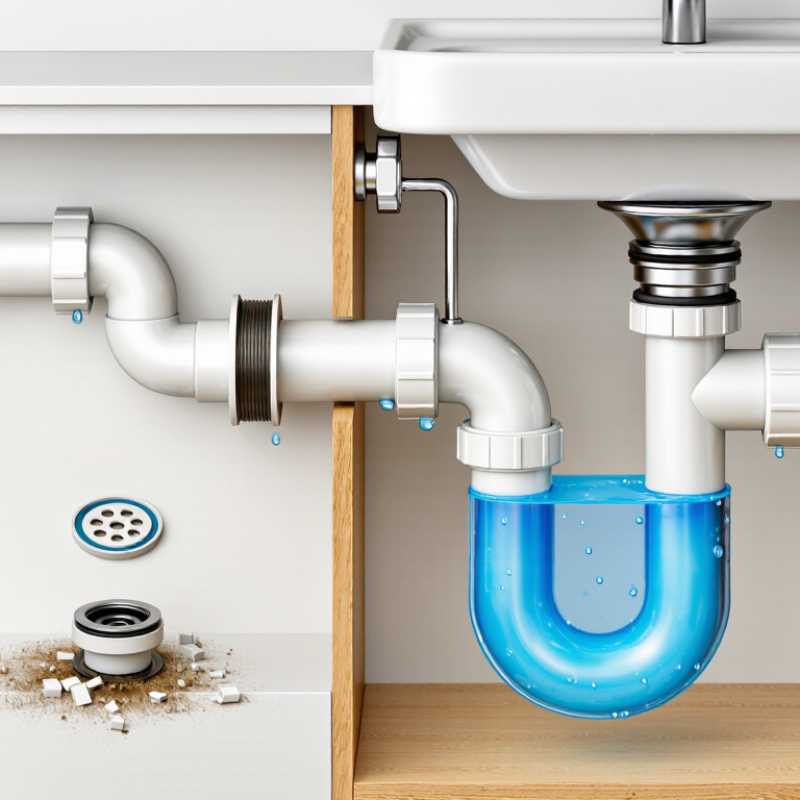
A basin drain is the visible outlet beneath a washbasin. Its standard 1½-inch outlet connects the basin waste to a strainer, tailpiece, trap, and branch drain. The strainer catches larger debris. The tailpiece carries water downward. The P-trap retains a small water seal, blocking sewer gases from returning indoors. It also provides a service point when hair or soap causes a blockage.
The outlet size is not chosen by faucet flow alone. The U.S. EPA WaterSense specification limits many bathroom faucets to 1.5 gallons per minute, but a drain must also manage short, sudden discharges. The 2024 International Plumbing Code lists a private lavatory as one drainage fixture unit in Table 709.1. That value describes system loading, not a universal pipe diameter. In practice, local code and the basin’s waste fitting still control installation.
Look underneath. A slip-joint nut joins the tailpiece to the trap. A beveled washer helps seal the connection. The trap arm then runs toward a vented branch line. Poor alignment can leave standing water outside the trap, which is a warning sign. Hand-tightening is often enough, but “tight” is not a measurement. Overtightening may distort washers and create a slow leak. ASPE plumbing guidance also stresses proper venting, yet real installations sometimes expose an uncomfortable flaw: a correctly sized outlet cannot compensate for a blocked vent or badly sloped pipe.
| Component or Dimension | Typical Specification | Function | Installation and Maintenance Notes |
|---|---|---|---|
| Drain Outlet | Nominal 1½-inch outlet; approximately 38.1 mm nominal size | Provides the primary passage for water to leave the basin and enter the waste pipe or trap. | Confirm that the outlet size matches the trap, tailpiece, and building drainage connection. Nominal pipe sizes do not always equal the exact outside diameter. |
| Drain Body | Threaded or compression-style body with a flange at the basin opening | Forms the main structural connection between the basin and the drain assembly. | The body should sit squarely in the basin opening. Avoid over-tightening, which can damage the basin or distort sealing surfaces. |
| Top Flange | Visible circular rim sized to cover the basin drain opening | Provides a finished appearance and helps distribute clamping pressure around the opening. | The flange should be clean and free from scratches, mineral buildup, or debris before installation. |
| Upper Seal or Putty | Flexible waterproof sealing material placed beneath the top flange | Prevents water from leaking between the drain flange and the basin surface. | Use a sealant suitable for the basin material and local plumbing requirements. Some basin materials require silicone rather than plumber's putty. |
| Rubber Washer | Flat elastomeric washer positioned below the basin | Creates a watertight seal between the underside of the basin and the drain body or locknut. | Install the washer evenly without twisting or pinching it. Replace it if it becomes brittle, flattened, or cracked. |
| Friction Washer | Rigid washer, commonly used between the rubber washer and locknut | Spreads tightening force and helps protect the rubber washer from deformation. | Use the washer supplied or specified for the drain assembly, and keep it centered during tightening. |
| Locknut | Threaded retaining nut fitted to the drain body below the basin | Clamps the flange, basin, seals, and drain body together. | Tighten firmly by hand and then only enough to stop leakage. Excessive force may crack ceramic or composite basins. |
| Tailpiece | Usually a 1½-inch nominal vertical pipe extending from the drain outlet | Connects the basin drain to the trap and carries wastewater downward. | Keep the tailpiece aligned vertically where possible. A slip-joint connection should remain accessible for inspection and cleaning. |
| Pop-Up Stopper | Lift-operated or push-operated basin closure | Allows the user to hold water in the basin and release it when needed. | Stopper movement depends on the drain design. Clean hair, soap residue, and mineral deposits from the stopper and opening regularly. |
| Lift Rod and Pivot Linkage | Mechanical operating parts used with a lift-style stopper | Transfers movement from the handle behind the faucet to the stopper inside the drain. | Adjust the linkage so the stopper seals without excessive force and opens high enough for normal drainage. |
| Overflow Passage | Internal or external water passage, present only on compatible basin designs | Directs excess water toward the drain when the basin level rises above the normal operating level. | A basin without an overflow requires a compatible non-overflow drain. Never assume all 1½-inch drains provide overflow protection. |
| Trap Connection | Typically connected to a 1½-inch nominal tubular or pipe trap | Provides the connection to the trap, which retains a water seal and helps block sewer gases. | Maintain the trap's water seal and ensure all slip-joint washers are correctly oriented. Check connections for leaks after installation. |
| Drain Screen or Strainer | Perforated or slotted insert, depending on the drain design | Helps limit the passage of large debris while allowing wastewater to flow through. | Remove and rinse the screen periodically. Do not use sharp tools that could damage the sealing or flow surfaces. |
| Typical Flow Path | Basin opening → drain body → 1½-inch outlet → tailpiece → trap | Describes the route water follows from the basin into the building drainage system. | Slow drainage can result from a blocked stopper, tailpiece, trap, venting issue, or downstream obstruction—not only from the drain flange. |
| Key Compatibility Check | Basin opening, overflow configuration, outlet size, trap type, and pipe material | Ensures that the selected drain assembly can seal correctly and connect to the existing plumbing. | Measure the basin opening and verify the drain's dimensions before purchase. Local plumbing codes may impose additional requirements. |
It carries used water from the bowl into the waste pipe. Water passes through the drain, tailpiece, trap, and branch line.
Gravity moves water through the pipe. A common guideline uses a ¼-inch drop per foot, or about 2 percent.
Dirty water may linger inside the pipe. Odors, buildup, and slow drainage can follow.
Yes. Water may outrun heavier solids, leaving them behind. This detail is easy to miss.
Usually, no. The basin drain is mainly vertical. The slope applies to the connected horizontal waste line.
The trap holds a small water seal. This seal helps block sewer gases from entering the room.
Proper venting allows air movement through the system. Without it, drainage may slow or produce gurgling sounds.
A drainage fixture unit estimates probable wastewater demand. It is not a direct gallons-per-minute measurement.
Testing may use controlled pressure, water depth, and outlet conditions. A restricted trap or sediment buildup can reduce actual flow.
Measure the pipe run before cutting. During inspection, collect discharge in a container and use a stopwatch.
Mark the required drop with a level. Check each joint for a steady fall, not a sharp dip.
Keep the trap accessible for cleaning. Allow practical margin for aging, sediment, and uneven installation conditions. Small errors matter.
A Basin Drain is a simple but carefully engineered system that carries water from a sink or basin into a building’s drainage network. Its standard 1½-inch outlet connects the basin to essential components such as the drain body, tailpiece, P-trap, and waste pipe. Gravity moves water through the piping when it is installed with an appropriate slope, commonly about ¼ inch per foot. This gradual fall supports steady drainage while reducing the risk of standing water and sediment buildup.
The P-trap retains a water seal, typically 2 inches as required by the IPC, to block sewer gases from entering the room while still allowing wastewater to pass. Drainage performance can be evaluated by comparing drainage fixture unit ratings with actual manufacturer flow data. Slow drainage, blockages, or backflow may result from hair, soap, sediment, poor venting, or an incorrectly installed trap. Understanding these components and warning signs helps maintain reliable basin drainage and makes troubleshooting more effective.
